I miss when we posted on this.
I demand posts!
I know you all cook.
Monday, November 15, 2010
Wednesday, July 28, 2010
The North Kitchen, Or Cutting Pie with Your Trowel
In the far away county of Orange, Virginia is the estate of the father of our Constitution. And to the South of his great mansion of Montpelier, work a rag tag team of eternally dirt covered archaeologists, slaving away in the heat and humidity, chipping away at the Piedmont Clay (Munsell color Reddish Brown, 5YR 4/6, most likely) to find evidence of former residents. They eat with dirty hands, disregarding health standards in favor of convenience.
To the north of the Mansion lies the North Kitchen, and every Thursday and Friday, one of the archaeologists sweet talks the staff at the demonstration kitchen into saving some of their delicious Madison-era style culinary treats, and bringing them to the hungry archaeologists in the field.
They bring us vegetable pie, we cut it with our trowels to share, and then put it in our dust pans to bring it around the site to the other hungry archaeologists. They also bring us strawberry tartlets, sweet breads, and so many delicious treats. God bless the North Kitchen demonstration staff. I love them with all my heart and soul, even when they give me funny looks for cutting the veggie pot pie with my trowel.
You all may scoff at my new habits, but there is nothing better than fresh bread after a day of shoveling fill from a previously excavated unit. You may never understand the joys of eating with your trowel, or out of a dust pan, or even with clay stained hands, but trust me, it is glorious. And if Mike Rowe has never done Dirty Jobs: Archaeology edition, he needs to get on that shit ASAP.
Love and miss you all!
Tuesday, July 27, 2010
Cupcake Gourmet
Disclaimer: this post is to appease Heather.
Once upon a time I wrote on this blog. Go figure.
I bought a book called Hello, Cupcake, and because I'm a crazy person, I became obsessed. Therefore, I HAD to make cupcakes for something. The choices were between my boss's birthday and Amy's graduation party, and seeing as my boss wasn't going to be here on her birthday, Amy happily won. And because I'm crazy, I couldn't just make regular cupcakes.
 These were all of the cupcakes (and yes, some people had snuck a couple by the time I took this!)
 This is a homemade chocolate cupcake with salted caramel frosting and a hard caramel candy swirl on top. The caramel took a little doctoring, but that just makes me feel like it's my own. And the candy took two tries, but it was yummy!
 This is a strawberry cupcake with a vanilla buttercream frosting and a GRADUATION CAP on top! It's just a Reese's miniature upside-down, an After-Eight mint, and a Twizzler pull-n-peel. Everyone super loved them, including Jay's adorable son Aiden, who tried to shove some in my mouth.
 Amy was the cupcake server, and as you can see, they went super fast! I ate a strawberry one, but I think the chocolate ones were popular too.
 So when my friend Amanda had a grad party, I made some for her too! These are brownies with caramel frosting and the graduation caps with "SBU" on top (Stony Brook University!). Caramel + chocolate = Delicious!
Get ready for me to make you some DELICIOUS cupcake creations when I get back! Miss you all, and happy to bring you your sweet tooth confection of the day!
-Courtney
Once upon a time I wrote on this blog. Go figure.
I bought a book called Hello, Cupcake, and because I'm a crazy person, I became obsessed. Therefore, I HAD to make cupcakes for something. The choices were between my boss's birthday and Amy's graduation party, and seeing as my boss wasn't going to be here on her birthday, Amy happily won. And because I'm crazy, I couldn't just make regular cupcakes.


Get ready for me to make you some DELICIOUS cupcake creations when I get back! Miss you all, and happy to bring you your sweet tooth confection of the day!
-Courtney
Sunday, July 25, 2010
Lobster Fun!
Hey Everyone!
Sorry for not posting in forever, but I've been lazy/busy. This past weekend I was in Boston visiting Mike. He has been on this quest to make me do New Englandey things like going to Fenway, picking cranberries, speaking in an obnoxious accent, etc.
Last night we were trying to decide what to do for dinner and he insisted that we boil our own lobsters. I was thrilled, because I've only had the opportunity to eat lobster once before, and he was paying for it!
 In case you were wondering, the lobster with the white rubber bands is Bob and the one with red bands is Horjay :-)
Making the lobster was really easy; all we did was bring a large pot of water to a rolling boil (large enough so that each lobster could be completely submerged)and cook the lobsters for about 12 minutes! We dipped ours in melted garlic butter but the lobster was so sweet it really didn't need a dressing.
The lobster dinner was a huge success and really fun to make together; absolutely a splurge and absolutely worth it!
Much Love,
Di
PS. HAPPY BIRTHDAY ANDREA!! WOOHOO Miss you, can't wait to see you and celebrate...live it up :-)
Sunday, July 11, 2010
Chili Suggestion
I don't make homemade chili. I mean, I make chili at home, but all the spices come in a packet and I just follow the directions on the back. So this isn't a recipe, it's just a deviation from the packet instructions.
Instead of using kidney beans, use Original Flavor Bush's Baked Beans. Drain the excess liquid before adding the baked beans, but not all of it. This switch makes the chili a little sweeter than normal. It's not much, but it's a nice change from the normal flavor. The boys who ate it seemed to like it.
Also, someone else needs to get on top of this blog. Seriously.
Sunday, June 27, 2010
Stuffed Peppers
Okay, so I'm sorry that I haven't been a very good poster, but I don't make very interesting dishes, and when I do they rarely involve measurments. For example, I made chicken the other day and the only way I could describe it would be to use a shit ton of chili powder and then add ground mustard, salt, and pepper to your liking. Anyways, I made stuffed peppers last night, and have a decent idea of the amounts you will need to here it goes. Heads up it's a very simple recipe but trust me they're good.
Here's what you will need:
4 Large Green Bell Peppers (the bigger the better, and if you can't find big ones get 5 average sized ones)
1 lb ground beef
12 oz Tomato sauce
1 cup white rice
1 packet of Lipton Onion Soup
A lot of shredded cheddar cheese
First things first, preheat the oven to 350 degrees.
Then, start cooking the rice because it always seems to take forever. I know you can all manage cooking rice without my instruction so I'll spare you the steps.
Next, brown the ground beef. Once it's all cooked, you're going to want to drain the excess fat. Seriously, don't leave it, it will mess up the consistency.
While you're waiting for your rice and meat to cook, you can clean the peppers. You want to cut of the top of the pepper and remove all the seeds and whatnot from the inside. Try not to cut too much of the top, because you're going to need a lot of room for the stuffing part. My family doesn't eat the pepper part, but if you want to, you're going to need to steam the peppers prior to stuffing them. I believe you can steam them in the microwave.
Heat up the tomato sauce and then mix the tomato sauce, the ground beef, the rice, and the lipton onion soup mix all together. They don't need to be heated while mixing, since they're all already hot and you're also going to bake them. For the rest of this post, this mixture will be referred to as the stuffing.
Once all this is prepared you're going to start the layering process. Put a layer of cheese on the bottom of every pepper. The amount of cheese you use is really at your own discretion. Next, fill the pepper halfway with the stuffing. Make sure you pack the stuffing in, so you can get the most for your space. Next, another layer of cheese. I love cheese. Then fill the rest of your pepper with stuffing. Once you've filled the pepper, add a generous layer of cheese on top.
Finally, bake the peppers in the oven for 20-25 minutes, or until the top is not only melted but the cheese is starting to brown slightly. Remove, and enjoy!!
If you have left over mix, you can either freeze it, or you can always bake it in an oven safe bowl, but it won't have the pepper flavor then. I didn't have leftover mix because whatever didn't fit in the pepper was eaten by an impatient and hungry boy.
Alright, there is my post. Also, I miss and love you all :)
Saturday, June 12, 2010
Duty Sucks
Hi girls,
Sorry I have been M.I.A. I would leave a recipe I made recently, but I have been on duty all weekend (ICK!) and therefore my meals have consisted of PB&Js and Macaroni & Cheese.
Yes, I am in the fourth grade.
And honestly, trying to remember what I ate last week is more difficult than it should be. Taylor was in charge of dinner one night and made penne with vodka sauce and chicken. It was very good. He and Chris are all about their George Foreman and will use any excuse to whip it out. The George Foreman. Get your heads out of the gutter :-)
Their apartment is almost complete. They both have beds. They have cable. Chris is bringing a book case. So they just need rugs and a couch, and then it will begin to look like a home. But not really until everyone is here. Then it will be a home.
Oh okay, here's one. I made some roasted vegetables the other night to serve as a side. They turned out a lot better than I thought they would. On my way home from Sesame Workshop (sidebar Andrea - it's going really well so far. Thanks again for helping me get it. They all loved you! I'm the girl that knows Andrea Cody. You're a celebrity! It's pretty funny), I stopped at a fruit/vegetable street cart and bought some asparagus. I thought I would steam it, but then realized that the boys don't have the right equipment for that. So, I improvised.
- 1 bunch of Asparagus
- 1 red pepper
- 1 green pepper (You can use whatever color peppers you want. I'm all about pepper equality.)
- 1/4 cup butter, melted
- 1 tsp. salt and 1 tsp. pepper
- 1 tsp. basil
- 2 tsp. garlic powder (you can use fresh garlic too, but I was too lazy to chop it)
- 1 tsp. rosemary (or fresh rosemary, if you have it)
Preparation:
Preheat oven to 350º. Chop up the vegetables (each asparagus stem made about three pieces). Line a baking sheet with aluminum foil and place vegetables on top. Pour melted butter evenly over vegetables. Sprinkle seasonings over vegetables and place on top oven rack for 15-20 minutes.
Anyway, I miss you all. Heather, hope Vegas is fun. Diana, hope your trip to the BX was fun. Andrea, hope your enjoying the hot and steamy weather in Oklahoma. Courtney, have fun in Europe!
Cheers,
Jen
Thursday, June 10, 2010
The Cupcake Truck

Once upon a time, in a magical land called Travelers, where there is a giant red umbrella and a sea of perfect white rocking chairs, there exists a special vehicle. It is unlike every other vehicle because this truck, my friends, is not just a truck.
It's a cupcake truck.
Yes, my friends, there exists a truck that produces delicious, delicious, custom cupcakes. And in Travelers land, these cupcakes have clever names. Perhaps you would like a "Travelers Championship Chocolate." Or maybe a "Peanut Butter Birdie." I personally had "Red 'Umbrella' Velvet" with white chocolate cream cheese frosting. It was delicious... but not as good as the cupcakes I had at Georgetown Cupcake in DC last summer. My mouth waters just thinking about it.
The Cupcake Truck is based out of Hamden, CT, and you can look it up online at www.cupcaketruck.com. And Hamden isn't so far from the Bronx... so maybe it will come somewhere near us.
I can't wait to update you all on the (hopefully) amazing food I find in Europe!
Love and cupcakes,
Courtney
Monday, June 7, 2010
Dangerously Good Peach Sangria…and other summertime indulgences
Hi Girls!
Sorry for not posting earlier. I wish I had a legitimate excuse for not posting other than a typical bout of summer laziness. But, truthfully, isn’t that what summer is all about?
Besides laziness, I do have a somewhat legitimate excuse for not posting more frequently; I have spent quite a bit of my free time getting to know the most recent love of my life.
His name is Liam and he is the blonde haired, blue eyed, 22 month old son of our new neighbors. He looks like a cherub and is too adorable. I want him.
I thought I would pass along a picture cause I know how much we all like babies!

Such a cutie.
In others news, Mike and I are breaking up so I may begin my quest to have blonde children. Seriously, though..this kid is just too cute. More pictures to follow.
Speaking of sweet, I know, I you are all going to love this sangria recipe. It’s the best I’ve ever had. It’s lighter than your typical red wine based sangria recipes and a little sweeter.
What You Need:
1 (750 milliliter) bottle of dry white wine
¾ Cup of Peach Schnapps
6 Tablespoons of frozen lemonade concentrate, thawed
¼ Cup White Sugar
One Pound of White Peaches, pitted and sliced (I used frozen peaches that I thawed)
¾ Cup Seedless red grapes, halved
¾ Cup of additional sliced fruit (I used strawberries and frozen raspberries)
1 Bottle of Spritzer(I used Diet 7-Up, but anything carbonated will work)
I know this looks like a lot of ingredients for Sangria, but TRUST ME, it comes together pretty quickly and it is absolutely worth any trouble.
How To Make It:
In a large pitcher, combine white wine, peach schnapps, lemonade concentrate and sugar. Stir until sugar is dissolved. Add sliced peaches, grapes and additional fruit.
Now, take a deep breath because you are one step closer to summertime happiness.
Refrigerate the sangria until well chilled, at least 2 hours, to blend the flavors.
How To Enjoy:
When you are ready to serve, pour ¾ of a glass with sangria and top it off with your spritzer of choice. Make sure to give it a good stir to mix it all up. Top with some sliced fruit and you’re ready to go.
The best way to drink this sangria is surrounded by half-naked European soccer players, but I’ll try to be understanding if that’s not possible!
I hope you enjoy the sangria recipe. It’s a wonderful party drink and simply perfect for summer!

Much Love,
Diana
Saturday, June 5, 2010
Penne Pasta with English Peas
Well, I guess its time someone stop being a slacker, and post some recipes or something. Once again, no pictures from me, mostly because I'm too lazy to stop every two seconds while I'm cooking and take pics and my little sister (who will be my photographer later this summer) is off gallivanting in Italy.
And since she's gone, I can make pretty much whatever I want for dinner and not worry about her silly eating habits (love you J.J.!). So, for dinner the other night, my mom and I teamed up. One the menu was pan-seared lamb chops, a nice salad (made with veggies from the Farmer's Market), and a pasta dish created by moi!
This week was pretty much the only week for English peas at the Farmer's Markets in Oklahoma (its flipping hot here, supposed to be 102 today, so they have a very short season, apparently). My mom bought a huge bag of shelled peas and left me to figure out a way to incorporate them into dinner. I thought, "Pasta dish!" and took it from there.
Ingredients:
About 2 cups shelled English peas
1/2 onion, chopped
About 1/2 cup of whole wheat penne pasta
1+ cups part-skim ricotta cheese
Chopped fresh mint (a few tablespoons)
Chopped fresh parsley (samesies)
Veggie broth
Salt and white pepper to taste
How I did it:
First, I washed the peas. This is a very important step, and must not be overlooked. Since the peas were locally grown and not shipped from South America, the chances that they carried e. coli were slim. I, however, do not like to chance these things. Then, I chopped half an onion. I added some olive oil to a hot pan, and sauteed the onions until they were translucent. Then, I added the peas. I smashed some of the peas as they were cooking, because I felt they needed to know who was boss.
While that was going in the pan, water was boiling for pasta. I cooked the pasta according to the directions on the package. Cooking pasta pretty much speaks for itself. When the pasta was done (al dente, please), I drained it and added it to the pan with the peas and onions. I let that cook for a few minutes more, while I readied the next step.
I took a little more than half a 16 oz container of ricotta and mixed it with all the fresh mint we had in the refrigerator. About two tablespoons? I don't measure, so I don't really know. Then I chopped up some parsley (about the same amount as the mint) and added that to the mix as well.
Next, I removed the pasta and peas from the flame. Then, I added the ricotta mixture, mixing it in to coat the pasta, and adding veggie broth to thin it out a little. I meant to save the pasta water, because I know its perfect for these things, but of course I forgot, so I thought peas are veggies, vegetable broth will do.
After this was all mixed in, I served immediately, as God intended pasta covered in ricotta cheese to be served. None of this "waiting around for it to congeal" nonsense.
The verdict: Yummy! Although, next time, I will either use less of the ricotta mixture, or more pasta, because I think it was a little too much. Still delicious, but it tried to hide the peas, who were supposed to be the star of the show, those poor little delicate guys with their week long growing season.
Maybe you all in more forgiving climates have a longer season for English peas. If so, I recommend buying them and eating them. Fresh peas are so much better than frozen, and lightyears better than canned. Also, eating local is the way to go. Farmer's markets are cheap, freah, and have produce of incredible quality. There is one every day of the week somewhere in Tulsa, so I'm pretty much addicted.
That's all for now, get to cooking, ladies!
With love and local-vores,
Andrea
Thursday, June 3, 2010
Apologies
I'm very sorry that I'm being a slacker with this site.
I will make up for it.
Someday.
I made dinner WITHOUT A RECIPE the other night... Andrea, you proud??
Tuesday, May 25, 2010
When You're Broke
So, since everyone else has posted something here, and I haven't been able to, I'm going to post two meals that Jen and I have made. Note that these meals aren't interesting or creative in any way, I just don't want to be left out.
The first meal Jen and I made was based on the odds and ends left to us by friends. Here is a list:
1.) 1/3 box of whole wheat pasta
2.) leftover tomato sauce made by Andrea
3.) a can of sweet peas with low sodium (this comes into play later)
4.) spaghetti
5.) grated parmesan cheese
6.) salt
7.) the willingness to believe that this meal would be good
So I go over to Tierney with my pasta, tomato sauce, sweet peas, and positive attitude. Jen takes one look at my pasta and decides we don't have enough. Which is funny, since I have tons of boxes of pasta in my room but decided that the leftover one would be more than enough for two people. I was wrong. So Jen gets her pasta and then we start the extremely complicated cooking procedure.
1.) Boil water. DON'T WATCH THE POT OR IT WON'T BOIL! Trust me.
2.) Add pasta to water. Stir sporadically.
3.) Drain the peas because Jen says there's too much water in them. Watch Jen add salt because she wants me to die from the heart attack I was avoiding by buying low sodium peas.
4.) Put tomato sauce in microwave. Turn microwave on (this is a really key part of the operation). Repeat process until sauce is hot.
5.) AFTER EVERYTHING IS COOKED mix them all together.
6.) Add the grated parmesan cheese.
7.) Eat. This is the part where the willingness to believe the meal is good comes into play. It actually was too.
Okay, so the second meal Jen and I made was breakfast this morning. Once again, not a complicated meal. Here is what you need:
1.) 1/3 pack of Bacon (courtesy of Courtney)
2.) 4 Eggs (bought at Tiger Mart at 10 pm after drinks at Howls)
3.) Salt (Once again Jen is trying to give me a heart attack)
4.) Pepper
5.) Whole wheat bread (aren't you proud of me Diana?)
6.) Peanut butter and jelly stolen from the RHO
So I am in charge of cooking the bacon. Which is awesome, cause I love cooking bacon. There are three reasons I love cooking bacon.
1.) I like my bacon well-done. And when I say well-done, I mean almost burned. So I like having control over how cooked the bacon is.
2.) There's an element of danger in cooking bacon, because of the spitting liquefied fat. As you all know, I like a little danger in my life.
3.) I get to sing the bacon song. This is the bacon song: http://www.youtube.com/watch?v=OBE_T-K8nhY (I promise you will enjoy it)
You have to cook the bacon until it's three sizes too small. Like the Grinch's heart.
Jen scrambled the eggs. She added salt and pepper, which was good cause we had no ketchup to add onto them. I was hoping to finally try eggs sunny side up, but we don't have a spatchula so I couldn't. That will be an adventure for another day.
After we cooked these, we set up some bread with jelly and peanut butter on it. Everything was really good, except the jelly was sugar free so it didn't taste nearly as good as normal.
I know you're all really jealous of me and Jen right now.
Monday, May 24, 2010
Grilled Pineapple and Chicken Skewers
Hey Ladies!
I figured that I should probably get my act together and post something to combat all of the wine drinking and tanning I’ve been indulging in since yesterday.
Last night’s dinner came right out of our pantry. Not wanting to run to the store, my Ma and I found 3 chicken breasts and a Tupperware container full of diced pineapple in the fridge. Inspired by a recent Pioneer Woman recipe we decided to marinate the chicken in teriyaki marinade and a ton of garlic. After letting the chicken marinate we chopped it into bit sized pieces and skewered it with the pineapple. Then we brushed the skewers with bbq sauce and grilled em up!
I know it was a good meal because the men in my family (who are immediately turned off by any kind of fruit and meat mixture) were sneaking extra pieces of chicken!
Yum, Yum, Yum. My apologies for the lack of pictures..or measurements of any kind. This recipe is pretty self explanatory and you can use whatever you have on hand.
If I hadn’t been finishing my 3rd (Let’s be honest, 5th) glass of wine as I was making dinner I probably would have marinated the chicken for at least an hour and I would have used a tangy/Asian style bbq sauce. But, such is life.
Hope you enjoyed the recipe.
Much Love,
Diana
Sunday, May 23, 2010
Pantry Dinner
Friday night, my last night in the Bronx, Heather came over and we scoured the kitchen for any and all left over food to make dinner. (I took a few pictures, but none of the end product--because I was too hungry to think about it--so I'm omitting pics from this post)
In addition to the approximately 100 unopened containers of chicken broth that we found deep within my kitchen cabinets, we found more than enough to make an absolutely delicious meal--with no recipe, which is my favorite way to try to cook.
What we found:
1 frozen chicken breast
1 box rotini pasta (whole wheat, the only way to go)
About 1/4 cup Balsamic vinegar
4 red potatoes
1 onion
And Garlic. Lots of Garlic.
(Plus some home-made tomato sauce I had made out of more left over ingredients on Wednesday)
This and some spices was all we needed to make a delicious, delicious meal.
I let Heather take care of the potatoes--she sliced then really thin, sliced about half an onion (also really thin), and then drizzled them with oil. We added salt, black pepper, and at Heather's suggestion Chili Powder. Popped them in a 400 degree oven, and waited for goodness.
While the potatoes were cooking, I took care of the chicken. Since we only had one breast, we decided to cut it up into bite sized pieces (which also reduced the cooking time). I also chopped up the rest of the onion, and smashed up a few cloves of garlic. I threw the onion and garlic in with some oil and then added the chicken. I let the chicken brown a little, and then discovered a little bit of butter left in my fridge, so, of course, I added that. To season the chicken, I added some salt and pepper, and a bit of dried basil. When the chicken was cooked through, I added the remains of a bottle of balsamic vinegar (probably about 1/4 cup), and let that reduce into a sauce. And Voila! Ready to serve.
We didn't time our dinner perfectly, and although the chicken and pasta were finished quickly, we still had to wait a while on the potatoes--which was alright, because they were pretty freaking delicious.
So, in conclusion, pantry dinner = Total Success. Heather will back me up on this.
With love and bison from Oklahoma,
Andrea
Saturday, May 22, 2010
Biscuit Indulgence
I think that my philosophy for my blog entries here will be that if I post appealing enough pictures of food, you will all drop all of your summer plans and flock to my kitchen.
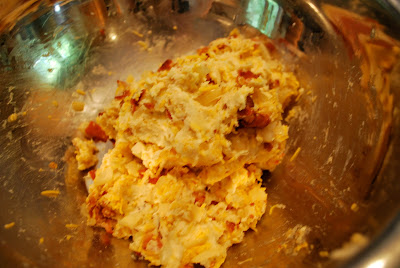
Last week, I decided that I was going to make Pioneer Woman's Bacon Onion Cheddar Biscuits because I was bored and I've been lusting after them for some time. They were fairly easy... they just took me a little longer because I was taking pictures at the same time. I also got to use Jon's fancy camera, but I suppose that I'm not really making the best use of it because I have no idea how all of the fancy stuff works. I just set it on "automatic" and "no flash" and go from there. Maybe I'll figure out how to take awesome pictures... someday.
---------------
Whatchu need, son:
Makin' it:
 Cooking bacon is my least favorite part, and eating bacon is my most favorite. So I decided to cook the bacon first. The bacon shrunk up a lot, so I cooked the whole pound.
 And I layered it to let the grease come off and let the bacon cool. Oh, and I ate a piece. Maybe two.
 Flour next. I'm not cool enough to have a strainer, so I measured the flour, baking powder, and salt into a bowl and mixed it around with a fork. Works the same, in my opinion.
 Then I took my quarter cup of Crisco, shuddered a bit at the pure fat that I was holding, and put spoonfuls around the flour. I'm sorry about the lighting, I'm still working on it.
 Then, because I'm also not cool enough to have a pastry cutter, I used a beater and just cut the Crisco into the flour mix. Again, I have no idea what I'm doing here.
 But eventually, it all incorporated and it looked a little lumpy like this. So that part is done.
 Egg stuff time. This is a cracked egg, and no, I didn't get any shells in it, thank you.
PS, when I worked at Panera my favorite job was making breakfast sandwiches because you got to crack and cook tons of eggs in this contraption thing. It was super cool.
 Add ten tablespoons of milk, which I didn't convert to cups. And I used skim milk cuz it was all we had. It worked fine. Also pretend like I took a picture of adding oil and mixing it all up.
 Now its time to bring the egg mixture and flour mixture together. So pour it right in...
 ...and use your beater to incorporate that just until everything's together. I'm guilty of using hands too.
 Filling time. Get yo' onion all ready...
 ...so that you can peel and chop it. I didn't take a picture of all that. PS: I love onionnnn. I made an onion and cheese omelette this morning. WHATTT?!?!?!
 Because I wanted to stay true to the Pioneer Woman, I did what she said and cooked it in the bacon pan. However, I poured off all of the bacon grease first. It filled up a whole mug!
 Boy oh boy. That looks brown. Shall we take a closer look?
 Oh yeah. Definitely done. Set this aside for a sec.
 Take the bacon that you didn't eat and chop it roughly. Or use your hands, like me.
 We don't really need all of this, do we? So I can sneak a couple of pieces? Oh, okay, good.
 Here comes the cheddar part of our bacon onion CHEDDAR biscuits. One cup... and a little more. Oh heck, I added in a handful more than this, too.
 Because I aspire to be the Pioneer Woman, I copied her picture. But it looks SO NICE, right?? Throw all of that in there pronto.
 And, of course, mix it all together. I used my hands... again. They were clean. Promise.
 I used two greased muffin pans and spooned some of the mixture into each tin. I ended up using 18, I think. Pop them into the oven at 375 for about 20 minutes and...
 ...heaven will emerge. Oh, joyous day. (This is a good pic too, right???)
 I might die. Seriously. Send help.
 Just to cement it in one last time... this is what you get if you come to Connecticut. This. And guess what??
There's still some left.
Just tell me when to pick you all up from the train station/airport.
---------------
And then I went to the gym four days straight. And then my body wanted to kill me. No, really, I''m serious. I think I limped to work Friday morning after Bodypump Wednesday and PiYo (pilates-yoga) Thursday (plus cardio each day, of course).
We bought three cartons of fresh strawberries today... so you'd better bet that that'll be next.
SENDING SOMERS LOVIN,
Courtney
Last week, I decided that I was going to make Pioneer Woman's Bacon Onion Cheddar Biscuits because I was bored and I've been lusting after them for some time. They were fairly easy... they just took me a little longer because I was taking pictures at the same time. I also got to use Jon's fancy camera, but I suppose that I'm not really making the best use of it because I have no idea how all of the fancy stuff works. I just set it on "automatic" and "no flash" and go from there. Maybe I'll figure out how to take awesome pictures... someday.
---------------
Whatchu need, son:
- 2 cups Flour
- 1 teaspoon Baking Powder
- ¾ teaspoons Salt
- ¼ cups Crisco
- 10 Tablespoons Milk (whole Milk Is Best)
- 4 Tablespoons Vegetable Oil
- 1 whole Egg
- 10 slices Thick Cut Bacon, Fried And Crumbled
- 1 cup Finely Diced Onion
- 1 cup Grated Sharp Cheddar Cheese
Makin' it:


PS, when I worked at Panera my favorite job was making breakfast sandwiches because you got to crack and cook tons of eggs in this contraption thing. It was super cool.


There's still some left.
Just tell me when to pick you all up from the train station/airport.
---------------
And then I went to the gym four days straight. And then my body wanted to kill me. No, really, I''m serious. I think I limped to work Friday morning after Bodypump Wednesday and PiYo (pilates-yoga) Thursday (plus cardio each day, of course).
We bought three cartons of fresh strawberries today... so you'd better bet that that'll be next.
SENDING SOMERS LOVIN,
Courtney
Thursday, May 20, 2010
Chicken Cutlets Done Right
Hi girls!
So the other day, I wanted to do chicken cutlets for dinner. This is a family favorite and a regular on the dinner table at the Lavalle house. But, I didn't want to do the same old thing. I wanted to lighten the meal, since I always feel like I'm indulging myself when I eat pan-fried chicken (pan-fried anything really). I have learned, through my adventures in the kitchen, that the best thing you can do to chicken in a frying pan is cook it with butter and olive oil. I used to just do olive oil - makes a huge difference.
Anyway, I found an Ina Garten recipe that I thought would be a good way to mix it up. It turned out great! The chicken tasted lighter and less fried than it normally does and the coating was flakey and delicious. I served the dish without the greens, but used the lemon vinagarette as a sauce for the chicken. YUM! A good family-friendly and kid-friendly meal! That's important, since I have so many children ages 20-22 to cook for! :-)
Here's the recipe. Thanks Ina Garten!
Ingredients for Chicken:
- 4 - 6 Boneless Skinless Chicken Breasts
- 1 cup all purpose flour
- 1 teaspoon kosher salt (I used sea salt)
- 1/2 teaspoon pepper
- 2 eggs
- 1 teaspoon water
- 1 1/4 cup dried bread crumbs (plain or seasoned, whatever you prefer)
- 1/2 cup freshly grated parmesan cheese
Ingredients for Lemon Viniagrette:
- 1/4 cup freshly squeezed lemon juice (I cheat and use bottled lemon juice)
- 1/4 cup good olive oil
- 1/2 teaspoon kosher salt (or sea salt)
- 1/2 teaspoon black pepper
Directions
- Pound chicken until it is as thin as you would like it. 1/4 inch thick is good.
- Combine the flour, salt, and pepper on a dinner plate.
- Combine the eggs and teaspoon of water in a shallow bowl.
- Combine the bread crumbs and parmesan cheese on a dinner plate.
- Dip the chicken in each dish - flour then eggs then bread crumbs.
- Heat one tablespoon of butter and one tablespoon of olive oil.
- Cook chicken on medium heat until browned on both sides and cooked through.
- Whisk lemon vinaigrette together in small bowl. Use as a topping for plated chicken as well as extra parmesan cheese.
ENJOY!
Subscribe to:
Posts (Atom)